How to Create a Vector in Python Using NumPy
How to create a vector in Python using NumPy is an essential skill for anyone working with numerical computations and data analysis. NumPy, short for Numerical Python, is a powerful library that provides support for large, multi-dimensional arrays and matrices, along with a collection of mathematical functions to operate on these arrays efficiently. In this comprehensive guide, we’ll explore various methods to create vectors using NumPy, providing detailed explanations and examples to help you master this fundamental concept.
Understanding Vectors in NumPy
Before diving into the specifics of how to create a vector in Python using NumPy, it’s important to understand what vectors are in the context of NumPy. In NumPy, a vector is typically represented as a one-dimensional array. These arrays can hold elements of the same data type and provide a convenient way to perform mathematical operations on large datasets.
NumPy vectors are essential for various applications, including:
- Scientific computing
- Machine learning
- Data analysis
- Signal processing
- Linear algebra operations
Now, let’s explore the different methods to create vectors using NumPy.
Creating a Vector Using NumPy’s array() Function
One of the most straightforward ways to create a vector in Python using NumPy is by utilizing the numpy.array() function. This function allows you to convert a Python list or tuple into a NumPy array, which can be used as a vector.
Here’s a simple example of how to create a vector using NumPy’s array() function:
import numpy as np

# Create a vector from a list
vector = np.array([1, 2, 3, 4, 5])
print("Vector created using numpy.array():", vector)
print("Shape of the vector:", vector.shape)
print("Data type of the vector:", vector.dtype)

# Create a vector with a specific data type
float_vector = np.array([1.0, 2.0, 3.0, 4.0, 5.0], dtype=np.float32)
print("Float vector:", float_vector)
print("Data type of the float vector:", float_vector.dtype)

# Create a vector from a tuple
tuple_vector = np.array((6, 7, 8, 9, 10))
print("Vector created from a tuple:", tuple_vector)

# Create a vector with strings
string_vector = np.array(['numpyarray.com', 'vector', 'creation'])
print("Vector with strings:", string_vector)
Output:

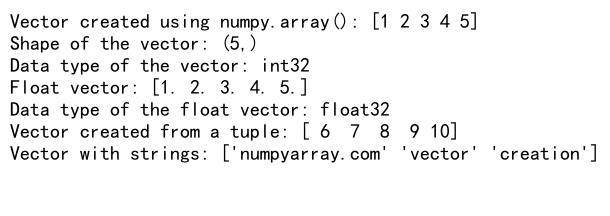
In this example, we demonstrate how to create vectors using different input types and data types. The numpy.array() function is versatile and can handle various input formats, making it a popular choice for creating vectors in Python using NumPy.
Creating a Vector Using NumPy’s arange() Function
Another useful method to create a vector in Python using NumPy is the numpy.arange() function. This function generates a sequence of evenly spaced values within a given interval. It’s particularly helpful when you need to create vectors with a specific step size or range.
Here’s an example of how to use numpy.arange() to create vectors:
import numpy as np

# Create a vector with integers from 0 to 9
vector1 = np.arange(10)
print("Vector from 0 to 9:", vector1)

# Create a vector with a specific start, stop, and step
vector2 = np.arange(2, 20, 2)
print("Even numbers from 2 to 18:", vector2)

# Create a vector with floating-point numbers
vector3 = np.arange(0, 1, 0.1)
print("Floating-point vector:", vector3)

# Create a vector with negative step
vector4 = np.arange(10, 0, -1)
print("Countdown vector:", vector4)

# Create a vector for numpyarray.com example
vector5 = np.arange(1, 6)
print("numpyarray.com vector:", vector5)
Output:

In this example, we demonstrate various ways to use numpy.arange() to create vectors with different start, stop, and step values. This function is particularly useful when you need to generate sequences of numbers with a specific pattern or interval.
Creating a Vector Using NumPy’s linspace() Function
The numpy.linspace() function is another powerful tool for creating vectors in Python using NumPy. This function generates a specified number of evenly spaced points between a start and end value. It’s especially useful when you need to create vectors with a specific number of elements or when working with floating-point ranges.
Here’s an example of how to use numpy.linspace() to create vectors:
import numpy as np

# Create a vector with 10 evenly spaced points between 0 and 1
vector1 = np.linspace(0, 1, 10)
print("Vector with 10 points between 0 and 1:", vector1)

# Create a vector with 5 evenly spaced points between -5 and 5
vector2 = np.linspace(-5, 5, 5)
print("Vector with 5 points between -5 and 5:", vector2)

# Create a vector with 100 points for a sine wave
x = np.linspace(0, 2 * np.pi, 100)
y = np.sin(x)
print("X values for sine wave:", x[:5], "...")
print("Y values for sine wave:", y[:5], "...")

# Create a vector for numpyarray.com example
vector3 = np.linspace(1, 5, 5)
print("numpyarray.com vector:", vector3)
Output:

In this example, we demonstrate how to use numpy.linspace() to create vectors with a specific number of evenly spaced points. This function is particularly useful in scientific computing and data visualization, where you often need to generate smooth curves or evenly distributed data points.
Creating a Vector Using NumPy’s zeros() and ones() Functions
When you need to create vectors filled with specific values, NumPy provides convenient functions like numpy.zeros() and numpy.ones(). These functions allow you to create vectors of a specified size filled with zeros or ones, respectively.
Here’s an example of how to use these functions to create vectors:
import numpy as np

# Create a vector of zeros
zero_vector = np.zeros(5)
print("Vector of zeros:", zero_vector)

# Create a vector of ones
one_vector = np.ones(7)
print("Vector of ones:", one_vector)

# Create a vector of zeros with a specific data type
int_zero_vector = np.zeros(4, dtype=int)
print("Integer vector of zeros:", int_zero_vector)

# Create a vector of ones with a specific data type
float_one_vector = np.ones(6, dtype=np.float32)
print("Float vector of ones:", float_one_vector)

# Create a vector for numpyarray.com example
custom_vector = np.ones(3) * 5
print("numpyarray.com vector:", custom_vector)
Output:

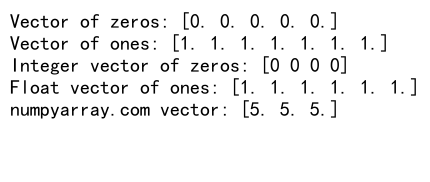
In this example, we demonstrate how to create vectors filled with zeros and ones using numpy.zeros() and numpy.ones(). These functions are particularly useful when initializing arrays or creating placeholder vectors for further computations.
Creating a Vector Using NumPy’s random Module
NumPy’s random module provides various functions to create vectors with random values. This is particularly useful in simulations, statistical analysis, and machine learning applications where you need to generate random data.
Here’s an example of how to create vectors with random values using NumPy:
import numpy as np

# Create a vector of random integers between 0 and 10
random_int_vector = np.random.randint(0, 11, size=5)
print("Random integer vector:", random_int_vector)

# Create a vector of random floats between 0 and 1
random_float_vector = np.random.random(5)
print("Random float vector:", random_float_vector)

# Create a vector of random numbers from a normal distribution
normal_vector = np.random.normal(loc=0, scale=1, size=5)
print("Random normal vector:", normal_vector)

# Create a vector of random numbers from a uniform distribution
uniform_vector = np.random.uniform(low=-1, high=1, size=5)
print("Random uniform vector:", uniform_vector)

# Create a random vector for numpyarray.com example
numpyarray_vector = np.random.choice(['numpyarray.com', 'vector', 'random'], size=3)
print("numpyarray.com random vector:", numpyarray_vector)
Output:

In this example, we demonstrate various ways to create vectors with random values using NumPy’s random module. These functions are essential for generating test data, simulating random processes, and implementing probabilistic algorithms.
Creating a Vector Using NumPy’s eye() Function
The numpy.eye() function is used to create a 2D array with ones on the diagonal and zeros elsewhere. While it’s primarily used for creating identity matrices, you can also use it to create specific types of vectors.
Here’s an example of how to use numpy.eye() to create vectors:
import numpy as np

# Create a 1D vector with a single 1
vector1 = np.eye(1, k=0)[0]
print("Vector with a single 1:", vector1)

# Create a 1D vector with 1 at a specific position
vector2 = np.eye(5, k=2)[0]
print("Vector with 1 at index 2:", vector2)

# Create a 1D vector with 1 at a negative index
vector3 = np.eye(5, k=-1)[0]
print("Vector with 1 at index -1:", vector3)

# Create a vector for numpyarray.com example
numpyarray_vector = np.eye(3, k=1)[0]
print("numpyarray.com vector:", numpyarray_vector)
Output:

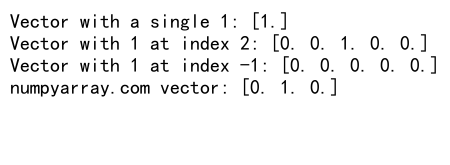
In this example, we demonstrate how to use numpy.eye() to create vectors with specific patterns of ones and zeros. While this function is less commonly used for creating vectors, it can be useful in certain scenarios where you need to create sparse vectors or vectors with a specific structure.
Creating a Vector Using NumPy’s full() Function
The numpy.full() function allows you to create a vector filled with a specific value. This can be particularly useful when you need to initialize a vector with a constant value or create a baseline for further computations.
Here’s an example of how to use numpy.full() to create vectors:
import numpy as np

# Create a vector filled with a specific integer
int_vector = np.full(5, 7)
print("Vector filled with 7:", int_vector)

# Create a vector filled with a specific float
float_vector = np.full(4, 3.14)
print("Vector filled with pi:", float_vector)

# Create a vector filled with a specific string
string_vector = np.full(3, 'numpyarray.com')
print("Vector filled with string:", string_vector)

# Create a vector with a specific data type
custom_vector = np.full(6, 42, dtype=np.int8)
print("Vector with custom data type:", custom_vector)
Output:

In this example, we demonstrate how to use numpy.full() to create vectors filled with specific values of different data types. This function is versatile and can be used to create vectors with any constant value, making it useful in various scenarios.
Creating a Vector Using NumPy’s repeat() Function
The numpy.repeat() function allows you to create a vector by repeating a given value or array multiple times. This can be useful when you need to create patterns or replicate certain elements in your vector.
Here’s an example of how to use numpy.repeat() to create vectors:
import numpy as np

# Create a vector by repeating a single value
vector1 = np.repeat(5, 4)
print("Vector repeating 5 four times:", vector1)

# Create a vector by repeating an array
vector2 = np.repeat([1, 2, 3], 2)
print("Vector repeating [1, 2, 3] twice:", vector2)

# Create a vector with custom repetitions
vector3 = np.repeat([1, 2, 3], [2, 3, 1])
print("Vector with custom repetitions:", vector3)

# Create a vector for numpyarray.com example
numpyarray_vector = np.repeat('numpyarray.com', 3)
print("numpyarray.com vector:", numpyarray_vector)
Output:

In this example, we demonstrate various ways to use numpy.repeat() to create vectors by repeating values or arrays. This function is particularly useful when you need to generate patterns or replicate certain elements in your vector.
Creating a Vector Using NumPy’s concatenate() Function
The numpy.concatenate() function allows you to combine multiple arrays or vectors into a single vector. This can be useful when you need to merge different parts of your data or create more complex vectors from simpler components.
Here’s an example of how to use numpy.concatenate() to create vectors:
import numpy as np

# Create vectors to concatenate
vector1 = np.array([1, 2, 3])
vector2 = np.array([4, 5, 6])
vector3 = np.array([7, 8, 9])

# Concatenate vectors
result_vector = np.concatenate((vector1, vector2, vector3))
print("Concatenated vector:", result_vector)

# Concatenate vectors with different lengths
vector4 = np.array([10, 11])
result_vector2 = np.concatenate((vector1, vector4, vector3))
print("Concatenated vector with different lengths:", result_vector2)

# Concatenate vectors with different data types
vector5 = np.array(['numpyarray.com', 'vector'])
result_vector3 = np.concatenate((vector1.astype(str), vector5))
print("Concatenated vector with different data types:", result_vector3)
Output:

In this example, we demonstrate how to use numpy.concatenate() to combine multiple vectors into a single vector. This function is particularly useful when you need to merge data from different sources or create more complex vectors from simpler components.
Creating a Vector Using NumPy’s meshgrid() Function
The numpy.meshgrid() function is typically used to create coordinate matrices for plotting 3D graphs. However, it can also be used to create vectors when working with multi-dimensional data or when you need to generate combinations of values.
Here’s an example of how to use numpy.meshgrid() to create vectors:
import numpy as np

# Create 1D coordinate vectors
x = np.array([1, 2, 3])
y = np.array([4, 5])

# Create 2D coordinate matrices
X, Y = np.meshgrid(x, y)

# Convert 2D matrices to 1D vectors
vector_x = X.ravel()
vector_y = Y.ravel()

print("X vector:", vector_x)
print("Y vector:", vector_y)

# Create vectors for numpyarray.com example
a = np.array(['numpyarray.com', 'vector'])
b = np.array([1, 2, 3])
A, B = np.meshgrid(a, b)
vector_a = A.ravel()
vector_b = B.ravel()

print("numpyarray.com vector A:", vector_a)
print("numpyarray.com vector B:", vector_b)
Output:

In this example, we demonstrate how to use numpy.meshgrid() to create vectors from coordinate matrices. While this method is less common for creating simple vectors, it can be useful when working with multi-dimensional data or generating combinations of values.
Creating a Vector Using NumPy’s fromfunction() Function
The numpy.fromfunction() function allows you to create an array by evaluating a function at each coordinate. While it’s typically used for creating multi-dimensional arrays, you can also use it to create vectors with specific patterns or mathematical relationships.
Here’s an example of how to use numpy.fromfunction() to create vectors:
import numpy as np

# Create a vector using a simple function
def linear_function(i):
    return i * 2

vector1 = np.fromfunction(linear_function, (5,))
print("Linear vector:", vector1)

# Create a vector using a more complex function
def quadratic_function(i):
    return i**2 + 2*i + 1

vector2 = np.fromfunction(quadratic_function, (6,))
print("Quadratic vector:", vector2)

# Create a vector for numpyarray.com example
def numpyarray_function(i):
    return i * 10 + 1

vector3 = np.fromfunction(numpyarray_function, (5,))
print("numpyarray.com vector:", vector3)
Output:

In this example, we demonstrate how to use numpy.fromfunction() to create vectors based on mathematical functions. This method is particularly useful when you need to generate vectors with specific mathematical relationships or patterns.
Creating a Vector Using NumPy’s logspace() Function
The numpy.logspace() function is used to create a vector with evenly spaced numbers on a log scale. This can be particularly useful in scientific computing, signal processing, and data visualization where logarithmic scales are common.
Here’s an example of how to use numpy.logspace() to create vectors:
import numpy as np

# Create a vector with 5 points between 10^0 and 10^3
vector1 = np.logspace(0, 3, 5)
print("Logspace vector (base 10):", vector1)

# Create a vector with 6 points between 2^0 and 2^5
vector2 = np.logspace(0, 5, 6, base=2)
print("Logspace vector (base 2):", vector2)

# Create a vector for numpyarray.com example
vector3 = np.logspace(1, 3, 4, base=5)
print("numpyarray.com logspace vector:", vector3)
Output:

In this example, we demonstrate how to use numpy.logspace() to create vectors with evenly spaced numbers on different logarithmic scales. This function is particularly useful when working with data that spans multiple orders of magnitude or when creating logarithmic plots.
Creating a Vector Using NumPy’s geomspace() Function
The numpy.geomspace() function is similar to logspace(), but it creates a vector with numbers spaced evenly on a log scale (a geometric progression). This can be useful when you need to generate a sequence of values that grow or shrink by a constant factor.
Here’s an example of how to use numpy.geomspace() to create vectors:
import numpy as np

# Create a vector with 5 points between 1 and 1000
vector1 = np.geomspace(1, 1000, 5)
print("Geomspace vector:", vector1)

# Create a vector with 6 points between 1 and 1/32
vector2 = np.geomspace(1, 1/32, 6)
print("Geomspace vector (decreasing):", vector2)

# Create a vector for numpyarray.com example
vector3 = np.geomspace(1, 125, 4)
print("numpyarray.com geomspace vector:", vector3)
Output:

In this example, we demonstrate how to use numpy.geomspace() to create vectors with numbers in geometric progression. This function is particularly useful when working with data that follows exponential growth or decay patterns.
Best Practices for Creating Vectors in Python Using NumPy
When creating vectors in Python using NumPy, it’s important to follow some best practices to ensure efficient and maintainable code:
- Choose the appropriate function: Select the most suitable NumPy function based on your specific requirements. For example, use
arange()for evenly spaced integers,linspace()for evenly spaced floats, andrandom.random()for random values. -
Specify data types: When creating vectors, specify the desired data type using the
dtypeparameter to ensure consistency and optimize memory usage. -
Use vectorized operations: Take advantage of NumPy’s vectorized operations to perform calculations on entire vectors rather than using loops, which can significantly improve performance.
-
Avoid unnecessary copies: When possible, use views instead of copies to save memory and improve performance. For example, use slicing instead of creating new arrays when working with subsets of data.
-
Use appropriate functions for initialization: Use functions like
zeros(),ones(), orfull()to initialize vectors with specific values, rather than creating empty arrays and filling them manually. -
Leverage broadcasting: Understand and use NumPy’s broadcasting capabilities to perform operations between vectors of different shapes efficiently.
-
Use meaningful variable names: Choose descriptive names for your vectors to improve code readability and maintainability.
-
Document your code: Add comments and docstrings to explain the purpose and functionality of your vector creation and manipulation code.
-
Handle errors gracefully: Use try-except blocks to handle potential errors when creating or manipulating vectors, especially when working with user input or external data sources.
-
Optimize memory usage: For large vectors, consider using memory-efficient data types (e.g.,
np.float32instead ofnp.float64) when precision requirements allow.
Conclusion
In this comprehensive guide, we’ve explored various methods for how to create a vector in Python using NumPy. We’ve covered a wide range of functions and techniques, from basic array creation to more advanced methods like logspace() and geomspace(). Each method has its own strengths and is suited for different scenarios, allowing you to choose the most appropriate approach for your specific needs.